Thursday, November 23, 2006

Ready to Doodle do?

hmmm now do I watch far to much CBeebies or is that This Weeks Dare ? Or Maybe both ;) I cant help the first one, that Chris (from doodle do) is just sooo yummy. Anyway onto this weeks dare

Jo set us this weeks dare and it was to get doodling! Our challenge was to make a card which incorporated some sort of doodle. Now that was a challenge for someone as artistically challenged as me, hell I cant even draw a straight line! But i perserved and thought I might as well make a couple of christmas cards whilst I was at it. So here they are .. (and if i ever see another holly leaf it will be too soon

Card One - Holly and Joy

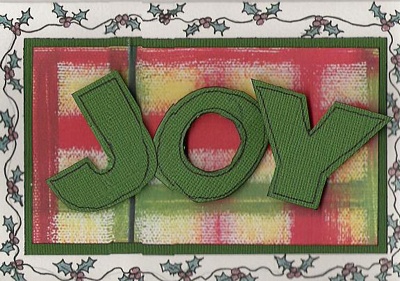
I covered letters from the MakingMemories Poolside alphabet in a dark green Bazzil card and cut round them, then highlighted the edges with a black pen line (excuse the dodgy "o" i cut my finger on the knife!!) I then attached 3d Foam pads and double mounted it onto Blonde moments paper and green bazzill card, each which had been inked around the edges. I then drew holly leaves and berries in black pen and coloured them in with Gel pens.

Card Two - Merry Christmas


This was a quick and simple one, I copied the lettering from a doodle font onto white cardstock with black pen and drew stitching around the edge. I then attached it with 3d Pads on a piece of Blonde Moments paper and then onto green bazzil. Which was then attached to a white DL card blank. The whole thing was topped off with a sizzix holly die cut.
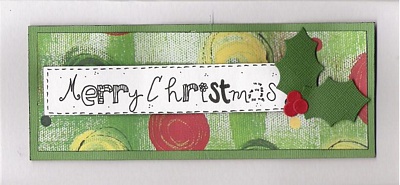
Friday, November 17, 2006


Dare 5 already!


Wow it doesnt seem a week since the language dare went live over on Daring Cardmakers but here we are again! Its been a mad week as my little sister had a baby girl last week and I have been down visiting them so left this weeks card till the last minute.

This week Debbie dared us to make a mens card using ribbon. Well I struggle enough with mens cards in general, let alone with ribbon.

So here is this weeks attempt. Please excuse the wonky, blurred picture it is straight in real life I promise


So quick run down - All done on a square card blank. I am afraid I cant remember the patterned paper make, it was in a Self Addressed Kit a while back (feb 2005!) cut into 2 pieces and made into a square with a piece of greeny blue linen textured cardstock. I then used brown and greeny-blue american crafts ribbon to hide the joins. The ribbon is actually glued down but I used MM pewter mini brads at each edge for effect.

The bottom element is a 2 paper flowers from Sarahs Cards with a pewter brad in the centre. This was glued onto a Bazzill Bosher thingy. I then used 2 strips of folding american crafts ribbon and attached it all with foam pads (poundland bargain!!)

The greeting is scraps of the green textured card and the patterned paper all matted and attached with 3d foam pads with DAD written in gold paint pen.

Simple but hopefully effective... Till next time bloggers xxxx

Saturday, November 11, 2006

Its that time again...............

Ok so it was that time again yesterday but I am on holiday so please can I be forgiven? Yep 10am yesterday another Dare was launched and this week it was set my little old me! My challenge to everyone this week is to make a card using another language. See surely it has to be easy cos of so much choice right? As usual the design team have come up with such a variety of ideas.

This week I managed to come up with two different ideas - BEBE and FINGERSPELLING.


The first one, BEBE, was created by stamping a hero arts baby footprint stamp in pale pink onto a very pale pink bazzil card, then mounted onto two different designs of Blonde moments sugar dumpling papers. All the edges were inked with the pink inkapd. This was then attached to the card with 3D foam. The french word for baby was made using hot fix crystals (gotta love the bling!) and double mounted as before. The whole card was then finished with a piece of pink ribbon tied round the spine.


The second, my favourite (FINGERSPELLING) was quick to do. Firstly I printed the alphabet in a British Sign Language Font as background paper, and inked the edges with black ink. I also attached a piece of purple ribbon, and mounted it onto a white card. Then using the font again I printed WELL DONE onto clear vellum and used white rub-ons to add the letters. I mounted this onto a piece of purple card and inked the edges. I also used hotfox crystals to hide where the glue marks came through the vellum.

Et Voila - this weeks dares! I cant wait to see everyones creations so get on over there and join in, remember you can email your card to daringcardmakers@hotmail.co.uk to be added to the gallery.

Friday, November 03, 2006

Dares' up - Sew look!


Oh my! That was my first words as seeing Kathys [url=http://daringcardmakers.blogspot.com/]Dare[/url] or something to that end anyway. Hmmmm a card to incorporate sewing, after last weeks kitchen dare. And if theres one thing I am worse at then cooking its chuffing sewing!!!

So here's this weeks offerings:

Card One Santa.

I love this little santa piccy. It was part of a scrapbooking paper by Paper Wishes and I cut his square out and added a little glitter onto his hat band, pompom and mitten band. Then mounted him onto green bazzil card cut into a tag shape , then again on a red one. Then came the sewing part, and many minutes and pricked fingers later I added in REAL SEWING!!!! 4 crosses in each corner, a real sewn on button and the stitched words "with love" all mounted on a dark green bazzil card base.

Card Two - Cute as a Button

Sorry for the photograph of this card, the flash sent it silly but without it, it all went a bit wobbly.

This one was made on a plain white cardstock base. I then attached 2 strips of ribbon down the card (ok i glued them rather than sewing) I then stamped and double mounted a baby footprint stamp by hero arts. The stripy paper is MMKids. I then used white rubons for the wording, swapping the O for a mini white button and mounted that on the stripey paper too.

To finish it off I added sewn on buttons at the top of the ribbon and 3 down the side of the card and tied off with white embroidery thread. Oooh I also lightly rubbed a little blue chalk all over the card.

So lets get going and I cant wait to see your cards. Dont forget that if you dont have blogger you can now email your cards to us at daringcardmakers@hotmail.co.uk and we will include you in the gallery.

Needles poised? Ready... Steady.... SEW!